Friday, May 31, 2013

Two Firsts, Stamping + Striping


Hello all you beautiful people! I apologize, I know it has been over a week since my last post, I've been so busy. Bad blogger! I do hope this was worth the wait because I have TWO firsts to share! Lets break it down!

stamping striping glitter nail art 1

Let's start with the easy stuff first, shall we? Base + Glitter: I've got OPI My Vampire Is Buff as a base on all my nails. I added two coats of Hare Polish Own Your Opulence on my pointer and middle fingers; they sort of inspired the rest of the look.

stamping striping glitter nail art 2

A little more advanced, Striping: This was literally my first ever attempt at using striping tape. Yes, it takes patience to perfectly lay down the tape. I have read on many nail blogs that there is a learning curve, so I armed myself with tweezers and extra lengthy cuts of tape. I was surprisingly happy with the result. I think since I read so many horror stories over time about the difficulty I was timid to try out striping tape for a while, but I am so glad I did.

stamping striping glitter nail art 3

It is not as hard as some people say it is. Just breathe and place, it is tape after all, you can move it around! If you haven't tried striping tape before, be warned: you need to let your polish dry for a bit after removing the tape, or the top coat will streak your work. The stark black, Wet n Wild Black Creme, against the bone white base was a daring first choice I realize, as I did re-do one of my thumbs. Oh well, let's learn from each other!

stamping striping glitter nail art 4

And finally, difficulty "I can't believe I can (sort-of) finally do this," Stamping: I have half-heartedly attempted stamping in the past but never succeeded in a full-on look until this time. I have been practicing stamping on pretty much every mani just before removal. It was so nerve-racking stamping for the first time! Clearly the attempt is far from perfect, but I was happy to at least capture what I was going for. AKA I didn't fail!  I used Nailz Craze plate #NC02 and Konad Black special polish.

stamping striping glitter nail art 5

stamping striping glitter nail art 7


I really like how the whole look came together. As soon as I purchased HARE polish Own Your Opulence I knew it would go great with OPI's MVIB. After I had finished the mani and wore it for a few hours, I realized just how many different colors make up this glitter polish! There are pastel pink, grayish-blue, and yellow hexes, along with gold hexes and micro glitters, and black squares and hexes! A LOT going on! Part of me wanted to go back and add color to my other nails, but the glitter in this polish can speak for itself!

TGIF! Have a wonderful day!

Disclaimer: All polishes purchased by me and all opinions are my own.

Tuesday, May 21, 2013

Jelly Sandwich + Gradient Accent


Good Evening! I have a fun little jelly sandwich to share! This is the final result, but I took pics along the way! ;)

*EDIT* I don't know how many shots are required for a "photo-heavy" post, but this one has 11.

Jelly Sandwich plus gradient accent

When I sat down to do my nails last night, this was not what I had in mind. I just love it when nail art evolves! Several months ago, I stumbled upon a macro shot of Tacoma Glass Blowa by Sonoma Nail Art (on Etsy here), and was drooling for a bottle. I took a macro myself when I got it in the mail. 

glass blowa macro

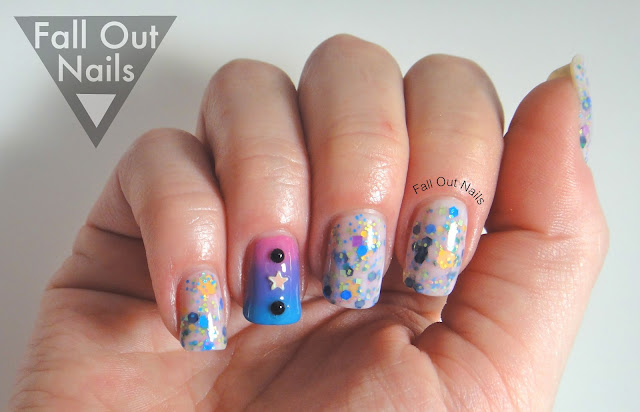
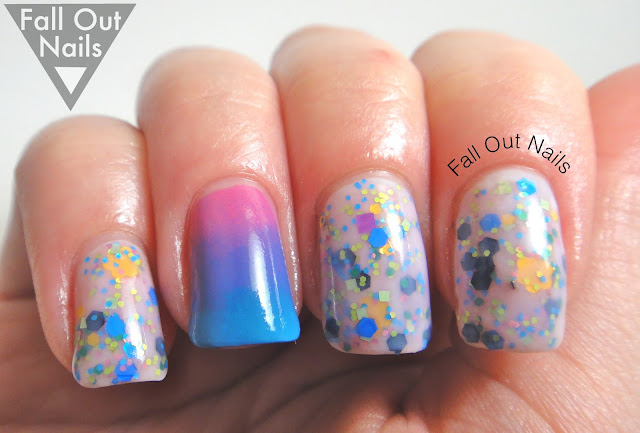
Once I added the polish to my stash, I couldn't figure out a way to capture the beauty and do it justice! So it sat in my helmer for well over a month. I wanted to create a look that was completely inspired by this polish. Finally, I decided to layer it over a sheer polish and see what came to mind. The pink and blue glitter stuck out so I decided to do a gradient on my ring fingers. 

Jelly Sandwich plus gradient accent 2

I used Don't Burst My Bubble by OPI for the base under Glass Blowa. For the gradient, the pink is Mod Square from Essie, and the blue is Savage from Sinful Colors. I do want to say real fast, even though this isn't a review, that this is just two thin coats of Glass Blowa, and it was a breeze to apply FYI.  

Jelly Sandwich plus gradient accent 3

Obviously, I couldn't stop there! I love how applying a sheer polish over glitter gives it a whole new look, so I grabbed Don't Burst My Bubble again and applied one thin coat over all the nails with glitter. The results were everything I hoped they'd be!

Jelly Sandwich plus gradient accent 4

I especially love how blue glitters look in a jelly sandwich. 

Jelly Sandwich plus gradient accent 5

Jelly Sandwich plus gradient accent 6Jelly Sandwich plus gradient accent 7

Originally, I thought about making everything matte, but I decided against it in the end. However, the look was still calling for something more... so I broke out the rhinestones! I already showcased the pink and blue glitter, but the gold and black glitters are also very present in Glass Blowa

Jelly Sandwich plus gradient accent 8

I used gold stars from Mash and black rhinestones from Ebay. (Yes, I know "Ebay" is vague, but honestly, I just added them to my cart from "suggested" after I added striping tape to my cart. Also, I remember they were very cheap.) 

Jelly Sandwich plus gradient accent 9

I really think it brought the look together. 

Jelly Sandwich plus gradient accent 10

Okay, who watches Adventure Time? My accent nail is starting to remind me of Lumpy Space Princess! That star on the blended purple?! Nerd moment, and not even ashamed. Thanks for reading, have a wonderful day!

Disclaimer: All products bought by me, all opinions are my own.

Nude Nail FAIL!

Happy Tuesday! I've got a nail fail to share (well, more of an idea fail) because we can all learn from each others mistakes. I definitely learn-by-burn :)

Basically, my idea was to create my own custom nude polish using an old face powder that matches my skin tone. Late last year I found a tutorial on how to create custom nail polish by funneling eyeshadow into a clear bottle of top coat. I thought it would be smart to use that same idea but with face powder to create that "mannequin hand" look, instead of trial-and-error shopping around spending money on different shades of nude.

nude nail fail

So, I dug out a powder that I don't use but still matched my skin and a funnel. I poured out a little bit of the clear polish to make room for the powder, placed the funnel on the bottle, and scraped some powder into the funnel using an orange stick. Then, I added two ball bearings and my favorite part: shake, shake, shake! 

nude nail fail 2

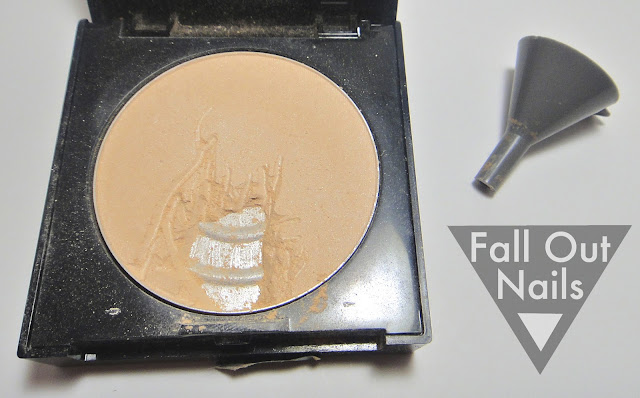
Here is the result. I'm sad to report it got WAY darker when it mixed together. 

nude nail fail 3

The contrast is even more apparent in person. I painted a swatch on a nail wheel just to compare to my skin. I did try to salvage my attempt by adding some white eyeshadow, but it made no difference, just added subtle shimmer. 

nude nail fail 4nude nail fail 5

nude nail fail 6
Nail wheel swatch against my arm.

So, there you have it. I think the color is pretty still, just not what I was trying to accomplish! 

Tuesday, May 14, 2013

It's my BIRTHDAY and I'll polish if I want to ;)

It's time for some birthday nail art! One of the first nail art pictures I ever stumbled upon was a couple years ago, and they were cupcake nails! I found them here. I figured this was the perfect occasion to attempt them :)

Birthday Cupcake Nails

I have a polish by Lush Lacquer called Birthday Cake, so I knew I wanted to include it in this look. I also used OPI Pink Friday, OPI Suzi's Hungary Again, and OPI Alpine Snow on my lil' cupcake. 

Birthday Cupcake Nails 2

I also purchased some sequins from MASH that I have been wanting to try. This was my first time using sequins and I used a dotting tool dipped in water to pick them up. I placed them while my top coat, Seche Vite, was still tacky and then topped them with another coat. 

I used Jindie Nails - Talk Nerdy To Me on all my other nails. (love that name!)

Birthday Cupcake Nails 3

Okay, I love Seche Vite with all my heart, but I used a bottle that was almost gone, and the shrinkage is killin' me! I swear I wrapped my tips with those dark pink lines! Ughh just wanted ya'll to know. 

I digress.. I do my best to find beauty in every color of the rainbow but I am a girly-princessey person at heart. So of course I grabbed these colors for my special day. 

While we are on the topic of my b-day, why not share my present to myself? My favorite animal is the bunny. When I found out there is a brand (HARE polish) with a bunny for their logo I was intrigued. Over time, I realized how hard it is to snag a bottle! Finally, I own a few! 

Hare Bottles 1

These are all from The Illuminated Life 2012 collection, 
L-R: Electric Flame, Bury the Hatchetfish, Atolla.

Hare Bottles 2

These are both from The Last Queen of France 2013 collection
Left: The Teen Queen
Right: Party Palace

I was ecstatic when they arrived in the mail, I always love Nail Mail! I took a few pics of the adorable packaging: 

Hare packaging 1
Hare packaging 2

A handwritten thank-you?! On BUNNY paper?! Happy Birthday indeed.

Disclaimer: I purchased these products with my own money, and all opinions are my own.

Holy Jinx!

Disclaimer: I bought this polish with my own money. These are my opinions.

SO, I was going to post these photos WITH my birthday nails, but I felt each deserved their own post. 

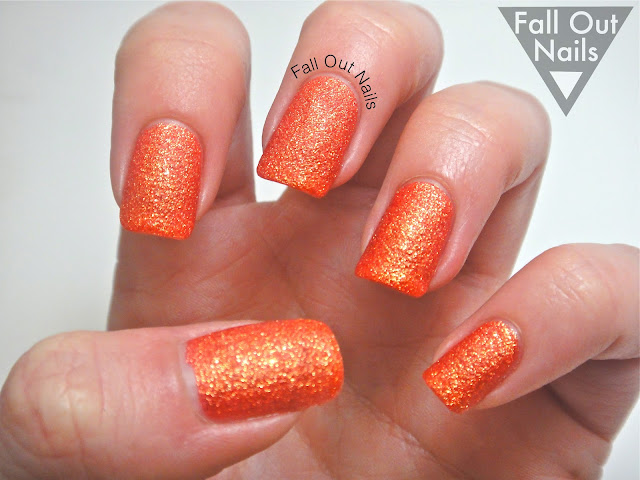
I recently purchased OPI Jinx from the 2013 James Bond collection, it is the first liquid sand polish I have tried. I'll let the pics do the talking. 

OPI Jinx swatch indoors

The best way I can describe this polish is it is like you spotted a gold bar barely buried under some hot pink and coral sand. Haha, I don't know if that hurts or helps but this is very eye catching.

OPI Jinx swatch indoors 2

I was worried the sandy texture would make me want to pick at my nails, but it is fine enough that it does not snag or feel rough. 

OPI Jinx swatch indoors 3

A note about removal: this polish is easier to remove than glitter polishes, but harder to remove than plain polish. I used regular nail polish instead of acetone so maybe that would have sped up the process. 

Here are some shots in direct sunlight:

OPI Jinx swatch outdoors

OPI Jinx swatch outdoors 2

Stay tuned for my birthday post! Its my birthday right now but my post will be belated thanks to this awesome polish! 


Thursday, May 9, 2013

My First Successful Gradient!

Hey ya'll, I am excited to share my first successful attempt at gradient nails! Since the day I discovered gradients and ombre nails I have been in love. Upon youtubing countless tutorials I became overwhelmed and only admired others from afar. I would practice on a nail or two between manis, but they always fell short.

bottle shot for crush on tin gradient

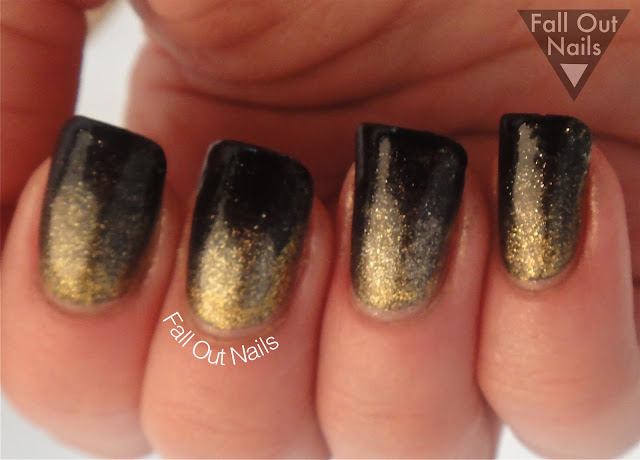
The past three days I have been sporting Crush On Tin by Hard Candy, and every time I glanced down at my nails I would catch myself tilting them in the light to appear like a gradient. Once I started getting tip-wear, instead of removing the polish, I decided to embellish it by attempting yet another gradient look. The black is Black Creme, and the gold is Oy-Another Polish Joke!

crush on tin hard candy gradient

I really love them! If I had one critique, it would be that I learned exactly why you should always use the lightest color for the base. I think it would have been even more stunning if I had started with the gold instead of the middle color that inspired it all. I am just nit-picking now though, I still finally achieved a look that I have been practicing for months!

crush on tin hard candy gradient 2

Also, I am LOVING my lightbox! It was a fun lil' craft, ( tutorial here) and now I think my photos look so much more professional. I actually grabbed my newly crafted lightbox and my camera, and went on an adventure all through my house to find the perfect lighting :) The laundry room seemed promising, but the fluorescent lights were SO not flattering. After a few more rooms, I ended up at the kitchen table with lights on, next to open windows.

crush on tin hard candy gradient 3

I am even sporting the look on both hands! I was going to take this off today because I have lots of ideas brewing, but I figured I could enjoy for a few more hours!

crush on tin hard candy gradient 4

TGIF!! Thanks for stopping by! 
♥♡♥

Sunday, May 5, 2013

Trip To Dallas + Haul

I have been in Dallas this past weekend house-sitting for my parents, so I don't have my stash with me! But I did go shopping! This is just a small post showing ya'll what I picked up because *drum roll* I finally got all my materials together to build my first lightbox! YAY I couldn't wait to try it out!

I knew before I left town that I wanted to visit the Lush store that is in the mall here, and I picked up:


Lemony Flutter cuticle butter
King Of Skin body butter + tin (sold separately)

Do you like the new triangle logo? I may make it a bit more transparent in posts to come, I'm still playing around with it. 


I got all of this stuff at Walmart:
 I replaced my beloved Seche Vite
found some cheap nail art tools, and
I finally snagged my own bottle of Duri Rejuvicote (which I have been dying to try!)


I also grabbed two more Hard Candy polishes:
the left is Crush On Tin
the right is Mermaid Magic

After having such a good experience with the Hard Candy polish in my last post, I figured I'd pick up a couple more while I was in town. So there you have it! I cannot wait to get back home tomorrow and set up this new light box and take more pictures! 

All products mentioned in this post were purchased by me with my own money


Thursday, May 2, 2013

B&W Glitter Skittle With Braided Accent

I am so excited to share my newest nail art with ya'll today! It was inspired by the extremely talented Sammy over at The Nailasaurus and I recreated THIS post. I have had that picture saved in a "to-do" folder on my laptop for a while and I finally got my hands on Hard Candy's Black Tie Optional and went for it! 

Black and White Glitter Skittle and Braided Accent

 I was so happy with how this turned out! Thanks for the idea Sammy! And while you're visiting her, you should check out her cleverly titled posts inspired by FOB! :D 

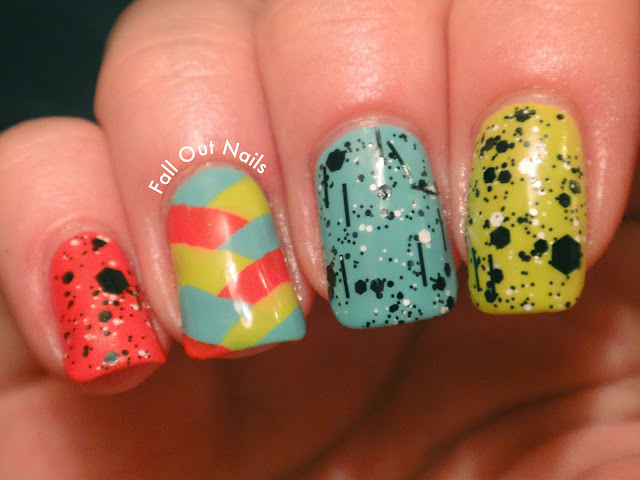
Honestly, the "braided" accent nail was not as hard as it seems, although a bit time consuming (waiting for layers to dry) I just used the polish brush. 

Black and White Glitter Skittle and Braided Accent 2

I was a little skeptical about Hard Candy's B&W glitter topcoat since it was only 4 bucks, but this is only 2 thin coats! I am super impressed. 

Black and White Glitter Skittle and Braided Accent 3

Black and White Glitter Skittle and Braided Accent 4

The red is OPI My Paprika Is Hotter Than Yours, the blue is China Glaze For Audrey, and the green is OPI Did It On 'Em

Bottle shots for Black and White Glitter Skittle and Braided Accent

I am still getting used to camera angles, lighting, and hand positioning. I'm a fast learner though and am going to construct a light box soon following THIS tutorial from the lovely Sarah from Chalkboard Nails! I have come a long way though haven't I?  

Black and White Glitter Skittle and Braided Accent 5

I hope ya'll enjoyed this! I am also working on posting faster. I had to get the hang of watermarks, cropping, etc. Practice makes perfect! 


All products were purchased by me.